Showing posts with label DIY. Show all posts

Thursday, April 28, 2011

Brassy to Classy

That title makes me laugh. It's so cheesy, but appropriate for this quick project.

Our current house definitely has the smallest bedrooms we've ever lived with. They are all pretty much the same size, even the master bedroom; unless you include the master bath as additional square footage. I actually prefer smallish bedrooms because they don't allow to you to furnish the space just to fill the space. You basically have to stick to the essentials and forget about the fluff and it doesn't look odd like it would in a humongo room.

When we moved in, our big tufted headboard just wasn't working for me anymore. It just seemed too large and kinda stuck out like it didn't go with our other bedroom furniture. I've always hoped that the hubby would be willing to replace the dresser and side table, but he's actually attached to it for sentimental reasons. It's not that I don't like it, it's just never been my style. Mission style furniture just isn't my fave. But, at this point we've decided we're holding on to it until...I don't know when, and the tufted headboard; it just had to go.

Enter The Lettered Cottage. After seeing the amazing transformation Layla did on her PB inspired headboard, I jumped out of my seat and began my Craigslist search for the "perfect" headboard to replace our big ol' one.
 
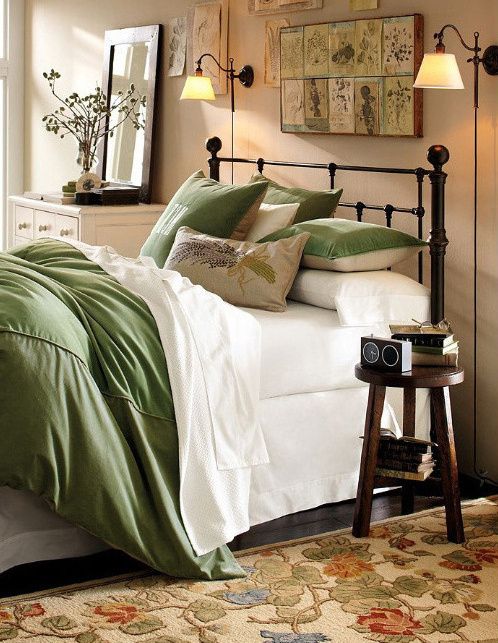
{pottery barn version for lotsa moola}

{TLC version for a lot less and beautiful!}

My "perfect" headboard was not initially so perfect on purpose. Here were my criteria: cheap, similar shape as the PB version, needed the round finials (I don't know why this stood out for me), and cheap. After a few days of searching I found one for $20. Score! It was brass, had almost the exact same shape as the PB one, and it had the round finials. Although when I got it, one of the finials was broken. That ended up being a bit of an ordeal to fix, but that's not important. 

{imagine something like this}

Since my headboard was not already painted like Layla's and I believe mine had a smoother texture, I decided to first prime the headboard using a tinted grey spray paint primer and then painted over with the oil-rubbed bronze. Three days, two cans of primer, and one of the oil-rubbed bronze and I was done! Yippee!

{all done. bad lighting.}
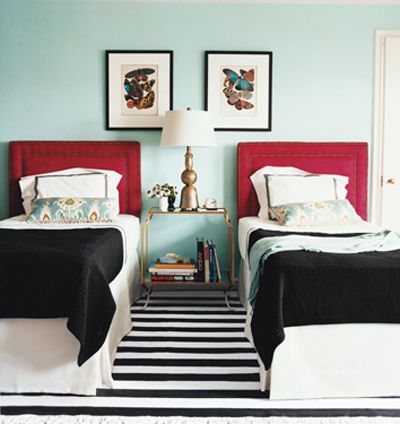
{with bedding}


Thanks to The Lettered Cottage for the inspiration. I saved a bajillion dollars (actually, more like a $1000). It actually ended up being "free" since I paid for the brass headboard and materials with cash I got from selling the old headboard and I had some left over. This made the hubby especially happy. 

Tuesday, April 19, 2011

art for everyday of the year

I don't remember where I read about this, but a while back I somehow stumbled upon the mother lode of free art. It is pages upon pages of amazing, wonderful, unique art! The NY Public Library Digital Gallery is.the.place. for all this fabulous goodness. 

Who can forget this gorgeous room from the late Domino Magazine? Well, see that pretty art above the bed? Yup, that can be found in that gallery right here!

source

How about an old map for your living room wall? There's plenty of those.

Orbis terrae compendiosa descriptio : quam ex magna universali Gerardi Mercatoris Domino Richardo Gartho, geographie ac ceterarum bonarum artium amatori ac fautori summo, in veteris amicitie ac familiaritatis memoriam Rumoldus Mercator fieri curabat A0. M.D. LXXXVII.
source

It is such an eclectic mix of art as well. You can even do a search for specific items. 

 Trochilus moschitus (ruby-crested humming-bird) native of the West Indian islands.

Resplendent trogon.

Limodorum tankerwillae

Sunset

Insectes : Hyménoptères, pl. 1.

Aloha oe : farewell to thee / composed by H. M. Queen Liliuokalani.

There's no reason to have bare walls now. 

Saturday, February 5, 2011

Congradulations! It's definately not Wensday!*

New house with a yard = new projects galore! There are so many things that I am extremely thankful for right now: becoming a stay-at-home-mommy, seventy degree weather in February, a hubby with a shorter commute...

One of the things on this list is now having a yard and area to do projects in. I love me some good crafty projects! I can whip out my brand-spankin' new power saws (only to be used when the hubby's at home), spray paint my little heart out, sew like it's going out-of-style, and refurbish old furniture. Yay!

One of my first large projects since arriving in our new place was to find a table for our dine-in kitchen area. I now have a real dining room and separate eating area for messy meals. Fancy. Of course I was not about to go out and buy a new table. That's too easy and usually more than I want to spend, so Craigslist searching it was. After a three week search,  I finally found a table that I thought was right and not in need of too much work.

In my mind, I envisioned a cute little pedestal table. I am a big fan of round tables. I don't think I've ever owned a rectangular or square table. I found a nice, white, pedestal table from C&B. The ad mentioned it needed to be refinished on top and I was up for the challenge. 

I picked it up in the evening because that allows more room in the car since the little one can stay at home with daddy. I saw it, noticed it needed work, and then brought it home. The next morning I realized it was in worse shape than the ad mentioned; bad Craigslisters. Don't lie, please. The previous owners had attempted to paint the top before, but from what I could tell, they had not sanded, primed, or used the correct paint. Oh, and they also didn't paint the leaf it comes with. Bad. 

{i immediately started started working}

{note gashes in tabletop}

{eek. more gashes and previous bad paint job}

My plan: sand, prime, and paint the top portion of the table using chalkboard paint. The hubby at first questioned the chalkboard paint. He's now convinced. It's a nice contrast to the white parts of the table, it hides some of the deeper gashes I couldn't sand out, and it's super fun. 

{second coat of primer. my cute assistant in the background}

{looking much better already}

{first coat of chalkboard paint}


I ended up doing two coats using a nice angled brush and then three coats using a small foam roller. 

Tonight, after waiting over a day for the paint to really dry, the hubby and I tested out the table after dinner. 


We love it. We had lots of fun talking and drawing once our plates were put away and we're looking forward to when Amélie will want to contribute to the artwork. We've also decided that any time we draw on it after dinner we're going to date it, take a picture, and in a year we'll compile a little picture book. Another fun little project. Oh, and the mismatched chairs...I'm working on that. 

*During our after dinner conversation we started talking about words that are frequently misspelled. I've seen a lot of this as an English teacher! Congratulations, definitely, and Wednesday were the top three.

Monday, May 10, 2010

Mason Jar Chandelier!

I stumbled upon this this blog and am impressed with all the amazing work the homeowners have done. It really makes me miss our little house in Petaluma where I could try out all of my crazy ideas. If we were still living there, I'd definitely try my hand at this DIY project.


{isn't it lovely?!}

You can check out the step-by-step instructions on how to create your very own chandie right here!

Thursday, January 21, 2010

Chalkboard for Teacher

I've decided I want a chalkboard in my house. Not just a little thinger, I want a big honkin' chalkboard.


Maybe not this big


But a little more like this.
Now all I need is some of this...


and a large white canvas. I think I might even make it pretty by doing some kind of border. I'll let you know how it turns out.

Monday, November 23, 2009

Mission Impossible?


{image borrowed from here}

Now answer me this...Is that fabulous wall design something I can do on my own? Should I wait for the decor stencil kit on my Christmas list? Can I paint it in a lighter color than chocolate brown and get away with it in our SF rental (poop. I miss MY house)? I can just paint one wall before we move right, right? no biggie...hmmm...I wonder what the hubby would say. Possible? Oui o non?

So I'm totally loving the stencil thing lately. I'm definitely not alone in this love. I mean, how could you not love the looks of the lovelies below?!
Graphic.walls
Picture 16
Picture 17
{images borrowed from there}
You can get your very own and might I add, reasonably priced, stencil from Whitewall and Co. 

Friday, November 13, 2009

Can I get some horns with that?

There's this shop over on Valencia that I have recently fallen in love with. When the hubby and I first came upon this delightful place all he could say about it was that it was "Weird" and "Why would anyone want to buy stuff there?" A few days later he mentioned that he'd brought up this unusual shop with one of his coworkers and the hubby didn't get the reaction he was expecting because the guy apparently seemed offended. I guess I'm not alone in my weird shop love.

On my day off this week, I decided I had to visit. Now what could possibly be weird about this store? Let me just say that one of the first things you see when you enter is a mounted horse head with a horn added to it so as to make it appear to be a unicorn. Weird or interesting? Aside from that unique object, they have an amazing collection of taxidermy framed butterflies (I love!) and an amazing array of plants. My personal faves being the succulents. They have beautiful vintage botanical prints, amazing artwork, and random bits and pieces. There is soo much to look at and as my title states, lots of horns. Mounted animals galore as well as the unusual in the style of the unicorn.

While I was there I had to pick up another succulent and a lovely ceramic (orange) flower pot. As I was walking towards the register, I was stopped by a plant on a plaque. No dirt needed there. They had a detailed description on the plant and the care it requires. I instantly decided I needed one and now I'm on the waiting list for a small one (since they didn't have any in stock on Wednesday). Meet Staghorn Fern. Mr. Fern if you please.

Product Image
                                       {yup, it's got horns, too}
platy5.jpgplaty6.jpgplaty4.jpg
Kendra

{how about this one in your living room?}


I guess even the nursery part of the store couldn't avoid having horns. Based on my little research on the net, you can buy one not on a plaque and then mount it yourself. All you need is some moss, some kind of string/tie, and a plant. Easy as pie. You can find out exactly how here!


{images courtesy of google search}

Tuesday, November 10, 2009

Finally!

Yup. I've finally taken some pictures of a few things that have been getting done around this casita. One was Moe the sad chair from ages ago. I am this close to getting it done. The others are a pair of roman shades I made for the window in the area beside the kitchen.

First up, the roman blinds. I have to apologize for a lack of pictures throughout the process. I'd been pretty good about doing so, but for whatever reason, I didn't take any for this project. I believe it's because I was using Jenny's tutorial over at Little Green Notebook and didn't think it was necessary to take my own. Now, I realize that maybe I should have because I added a step or two. Anyhoo, here they are:


{step I added: sewing white muslin to the front fabric and then turning it inside out before gluing the whole thing together}
{I wanted a white liner on the back}


{another step: adding grosgrain ribbon with fabric glue. I love orange}

Moving onto the wingback chair:
{scary before}

{not so scary almost-after}

{ I still have to sew the cover for the seat cushion. I've been slackin'.}


{ignore the imperfections please. it was my first time}

{pattern up close and the jute/cotton cord I'm running around the edges of the chair. another thing I still need to do!}

The work. Man. What a pain it was to remove what seemed like 126,286,636,364 staples and then putting ALL those staples back on it for the reupholstery. For most of that work I used my hard core business NOT electric staple gun. My hand hurt. A lot. Then, on a visit to my local little hardware store I spotted my savior. An electric staple gun...with a trigger...and lots of power...for $40!!! I guess I thought an electric staple gun would have been expensive, but I was wrong. It made the rest of the project a lot more pleasurable for my hands, but still not pleasing to the ears of the doggies and probably the people living in the upstairs flat. Oh well.

As far as putting it together, I basically worked in reverse. I found the supplies at an upholstery store in town and then did some research on the internet. I know it's not perfect, but it's good enough for me.

I'm overall very pleased with these two projects and of course the projects are neverending around here. I've got some faux roman blinds for the office I'm making tomorrow (yay, for Veterans!) using the fabric below. I again found a great deal on ebay; 5 yards for $25!


{amy butler henna paisley in blue}

I will have to remember to take pictures this time.

Monday, November 2, 2009

Martha, I love you

I don't care what others say. I know she has loads and loads of people that help her come up with all these fabulous crafts, but I don't care. I want to grow up to be the Latina Martha, or "Marta." =)

{seriously martha...so chic}


{oh martha...just love the color and that bench/settee thinger....just fabulous!}


{martha, I just love this whole look. too bad those benches probably cost a butt load}


{you know martha, I've been meaning to do this with a canvas...but a magnetic board...so clever}


{martha. can you just toss me some of your antique fabric to make a looker like this?}


{martha, we must be related because I love orange too!}


The images above are from Martha's "quick and easy upgrades." For her DIY instructions, visit her here!